pg_tileserv
About
pg_tileserv is produced by Crunch Data (https://www.crunchydata.com/)
The documentation and examples provided are extensive (https://access.crunchydata.com/documentation/pg_tileserv/latest/)
We’ll confine ourselves below to the usage and layout of the service in GeoSuite
pg_tileserv
pg_tileserv is installed as a systemd service during installation.
The service can be started and stopped via command line or Webmin.
The service file contents are show below.
[Unit]
Description=PG TileServ
After=multi-user.target

[Service]
User=pgis
WorkingDirectory=/opt/pg_tileserv
Type=simple
Restart=always
ExecStart=/opt/pg_tileserv/pg_tileserv --config /opt/pg_tileserv/config/pg_tileserv.toml

[Install]
WantedBy=multi-user.target
The file is installed at
/etc/systemd/system/pg_tileserv.service
Command Line
Service commands:
root@postgis:~# service pg_tileser stop | start
Access
pg_tileserv runs of port 7800 and can be accessed at http://doamin.com:7800
You can change the port via the pg_tileserv.toml file located under /opt/pg_tileserv/config
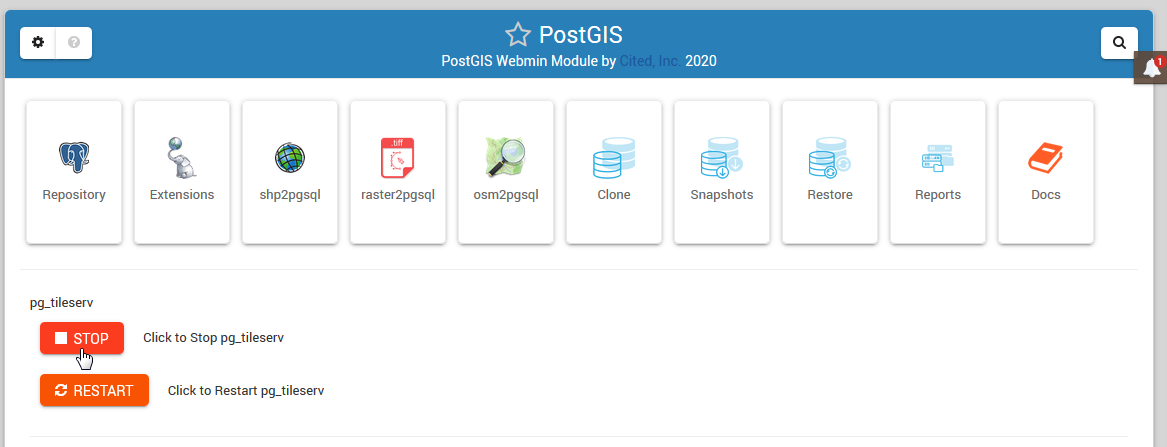
Webmin
To start and stop the pg_tileserv service, click the button as below.

Database
On installation, a database is created called postgisftw.
This database contains the demo data.
A user pgis is also created and given permission to the database.
The password for pgis is displayed at the end of installation as well as saved to /root/auth.txt
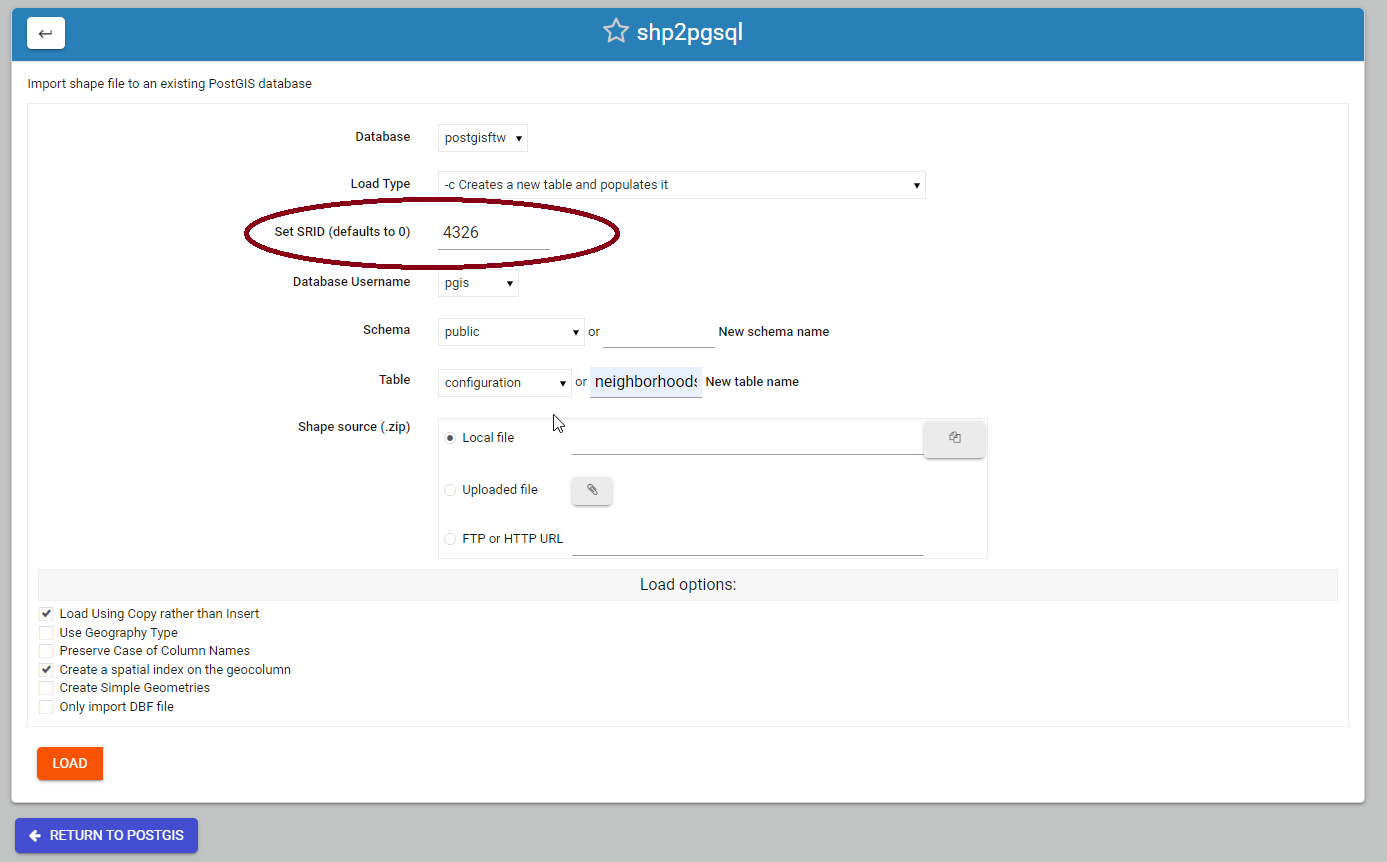
Loading Data
When loading data to any database for which you will use pg_tileserv, you MUST set a SRID
Without a declared SRID, pg_tileserv will not pick up the table.
Structure
pg_tileserv is installed by default at
/opt/pgtileserv
The directory structure is show below
/opt/pg_tileserv
├── LICENSE.md
├── README.md
├── assets
    ├── index.html
    ├── preview-function.html
    └── preview-table.html
├── config
    ├── pg_tileserv.toml
    └── pg_tileserv.toml.example.save
└── pg_tileserv
Configuration File
On installation, the pg_tileserv.toml configuration file is updated to include the postgisftw connection inforation
DbConnection = "postgresql://pgis:G84iwLdL9jeyA7IiwkTmWhyHwKR41Qxz@localhost/postgisftw"
Enable SSL
To enable SSL on pg_tileserv, follow the steps below
1. Copy the fullchaim.pem and privkey.pem files from letsencrypt to the pg_tileserv directory
cp /etc/letsencrypt/live/domain.com/fullchain.pem /opt/pg_tileserv/fullchain.pem
cp /etc/letsencrypt/live/domain.com/privkey.pem /opt/pg_tileserv/privkey.pem
2. Change to the /opt/pg_tileserv directory and chown the owner of the chain and key files to user pgis
cd /opt/pg_tileserv
chown pgis:pgis fullchain.pem
chown pgis:pgis privkey.pem
3. Find the following lines in /opt/pg_tileserv/config/pg_tileserv.toml
# Accept connections on this port
HttpPort = 7800
# HttpsPort = 7801
4. Update the lines to below
# Accept connections on this port
# HttpPort = 7800
HttpsPort = 7801
5. Find the following lines in /opt/pg_tileserv/config/pg_tileserv.toml
# TlsServerCertificateFile = "server.crt"
# TlsServerPrivateKeyFile = "server.key"
6. Update the lines to below
TlsServerCertificateFile = "fullchain.pem"
TlsServerPrivateKeyFile = "privkey.pem"
7. Restart pg_tileserv to pick up changes
service pg_tileserv restart
or use the Restart button in the control panel
You should now be able to access pg_tileserv via:
The postgisftw Database
As part of the GeoSuite installation, a database, user, and password are created.
This database, postgisftw, is actually the demo database created for pg_tileserv, but we use it throughout the tutorials.
To connect to the database via SSH:
su to user postgres:
su - postgres
Start pgsql
postgres@demo:~$ psql
psql (15.3 (Ubuntu 15.3-1.pgdg22.04+1))
Type "help" for help.
List database using \l This will provide a list of database, as well as owners:
postgres=# \l
                                        List of databases
Name    |  Owner   | Encoding | Collate |  Ctype  | ICU Locale | Locale Provider |   Access privileges
------------+----------+----------+---------+---------+------------+-----------------+-----------------------
geostore   | postgres | UTF8     | C.UTF-8 | C.UTF-8 |            | libc            |
postgisftw | pgis     | UTF8     | C.UTF-8 | C.UTF-8 |            | libc            |
postgres   | postgres | UTF8     | C.UTF-8 | C.UTF-8 |            | libc            |
template0  | postgres | UTF8     | C.UTF-8 | C.UTF-8 |            | libc            | =c/postgres          +
    |          |          |         |         |            |                 | postgres=CTc/postgres
template1  | postgres | UTF8     | C.UTF-8 | C.UTF-8 |            | libc            | =c/postgres          +
    |          |          |         |         |            |                 | postgres=CTc/postgres
(5 rows)

(END)
Connect to the postgisftw datbase using the \c command
postgres=# \c postgisftw
You are now connected to database “postgisftw” as user “postgres”.
List the tables in the database using the \dt command
postgisftw=# \dt
               List of relations
Schema |       Name        | Type  |  Owner
--------+-------------------+-------+----------
public | configuration     | table | pgis
public | countries         | table | pgis
public | pointsofinterest  | table | pgis
public | spatial_ref_sys   | table | postgres
public | ways              | table | pgis
public | ways_vertices_pgr | table | pgis
(8 rows)

postgisftw=#
Documentation
https://access.crunchydata.com/documentation/pg_tileserv/latest/